
Personalization was first introduced in Windows Vista. It is a set of several options, united under one "roof", with the help of which you can influence the appearance of the operating system interface. This option has been transferred to the new operating system practically unchanged, with some improvements in the interface and the use of additional effects.
As before, the "Personalization" options is located in the "Control Panel".
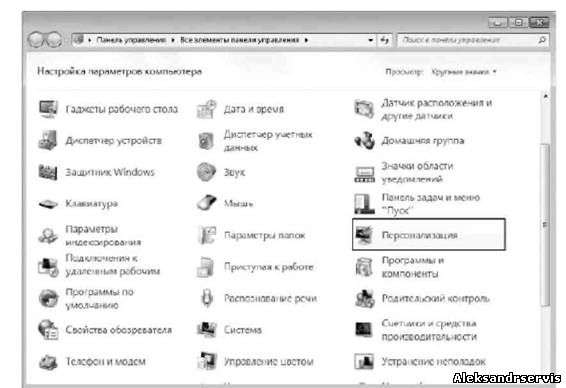
Using the "Personalization" option, you get access to setting the following parameters of the system interface:
- Desktop Themes
- Desktop Background
- Windows Colors
- Sounds
- Lockscreen
- Desktop icon
- Mouse Pointer
- Account Picture
Let's take a quick look at these parameters.
Desktop Themes
The visual design of the Desktop is the first thing that catches your eye after starting the operating system. The design is very important as it affects whether you will be able to use the operating system with pleasure in the future or simply get used to it. It is proved fact that the visual perception of an object unambiguously influences its practical use.
So, let's see what kind of visual design the new Windows 7 operating system offers us.
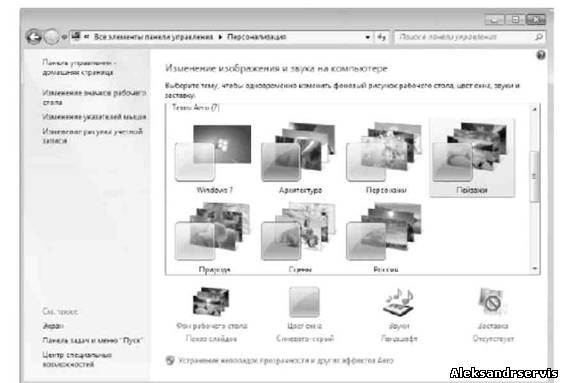
After opening the "Personalization", you will see a window with an activated theme settings tab. The Desktop theme changes not only the desktop background, but also sounds, window color and other parameters. However, after you have selected a Desktop theme, you can additionally change each of the components of the selected theme, including the background and sounds. Below you can find the detailed instruction on how to do this:
Customizing the Desktop Theme
The Windows 7 operating system offers two themes to choose from: Aero and Standard Basic Themes. Users whose computer power meets the recommended requirements for installing the Windows 7 operating system are a little more fortunate, because instead of the standard theme, they can choose one of the Aero themes, which have much more visual effects. Other users can also install Aero themes, however, as a result, they will receive only the corresponding desktop background and sound scheme, but will not be able to enjoy most of the effects: window transparency, taskbar add-ons, visual effects when switching between windows, etc.
Theme installing is easy - you only need to select the theme you like from the list. You will immediately see the result and you can easily set the theme that best suits your mood and idea of how your desktop should look.
Also note that there is a link to "Other Themes" at the top right of the list. Clicking on it will take you to the Microsoft website, to the personalization section, which contains a wide variety of different themes and desktop backgrounds that are not included in the standard set. By clicking the "Download" button and choosing the Open option in the window that appears, you simplify the process of installing the theme to the operating system as much as possible. You just have to wait for the download process to finish and allow the installation of the new theme. Any theme that is installed in a similar way, for example, by downloading from the Internet, then goes to the My Themes section, located at the very top of the list of themes.
Desktop Backgrounds
It is also possible to change the Desktop Background anytime you want. For example, you like sounds of your new theme but not the background. No problem: you can easily change the background.
In order to change the background, click on the "Desktop Background" link and you will see the list of images that change depending on which of the location sources is selected. For example, you can use the images from image library or pick the most popular images. But if it is not enough for you, you can always click the “Browse” and pick any other folder with images.
Like themes, desktop background changes immediately as well, so you can see the result quickly. If you don’t like it, choose another one.
Now comes the most interesting part. The operating system allows you to install both a single permanent image and customize a slideshow of selected images. Setting up a "stable" image is very simple: choose a suitable background and click the "Save changes" button. To set up a slideshow of images, you need to do the following:
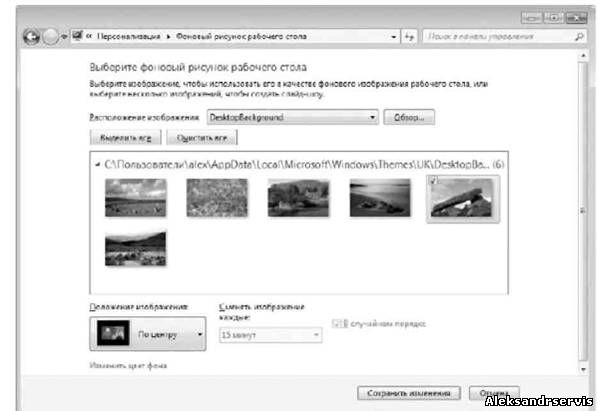
1. Mark the images that should be included in the slideshow. In this case, it is most convenient to save the images you want to one folder and then specify it using the Browse button. After that, you can click the "Select All" button to mark all images at once. You can also mark images using "Ctrl" or "Shift" key.
2. Specify the position of the image by choosing one of the values: Fill, Fit, Stretch, Tile, Center. If the image is larger than the screen resolution, this will not lead to problems, you just need to select the Fill or Stretch position from the list. If the image resolution is lower and it distorts when stretched, you can modify the desktop background by choosing a color that complements the image. In order to do this, use the Change background color link at the bottom of the window.
3. Select the frequency of changing images using the list “Change images every…”. There are options from 10 seconds to 1 day. The most optimal and "calm" option is to set the frequency in about 1 hour: it is pleasant to the eye and does not bother.
4. Specify a way to change images. By default, the images are rotated in order as shown in the list. If you want to add some variety to your slide show, you can select the "Shuffle" checkbox.
To apply changes, click the Save Changes button.
Windows Colors
The ability to customize the color scheme of the window exists since the Windows XP operating system, and has not changed at all. To use this option, you need to click on the Window color link at the bottom of the window.
There are a lot of elements you can choose. Some of them apply only to the Aero theme, while most of them concern the standard desktop theme, as indicated by the inscription in the window that opens.
Here, in addition to the actual color design of windows and its elements, you can also customize labels by specifying the font and size. For example, you can set a different font for the window title, define the spacing between icons, the color of hyperlinks, and more.
Sounds
Sounds are directly involved in the perception of the desktop, so it is natural that the Windows 7 operating system allows you to customize them as you like.
In order to switch to the sound control mode, select the "Sounds" link in the window.
A similar configuration method existed in Windows Vista, and compared to this operating system in Windows 7, there were no significant changes in this regard.
Sound control is very simple. There are more than ten different sound schemes to choose from, which you can set using the "Sounds" list. Once the sound scheme is selected, you can proceed to control the sounds responsible for various options in the operating system.
In the central part of the window is a list of all system events and sounds associated with them. If sound is set, a speaker icon is displayed next to the corresponding event. Regardless of whether a sound is installed or not, you can change it or bind it to an event using the "Sounds" list: after marking the required event, open the "Sounds" list and select one of 40 sounds. If you do not need a sound for the event at all, select the "None" item in this list.
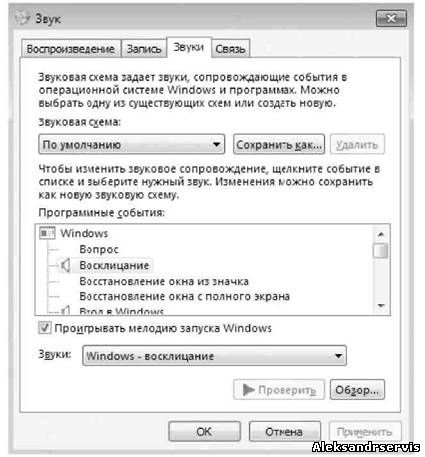
You can do the same with any system event. As a result, a new sound scheme will be formed, which you can save using the "Save As" button, which will allow you to select it at any time.
If you are not satisfied with the set of system sounds, you can specify your sounds using the “Browse” button. By default, only WAV format files can be selected. But is this a problem if there are a large number of programs with which you can easily convert any audio file to WAV?
Lockscreen
Since there are times when you are not at your computer, the operating system may display a lockscreen when it enters power saving mode. In this case, in addition to saving energy, you get a picture pleasing to the eye. And besides, you can make it so that you can exit the screen saver mode only after entering the password. This means that no one can see the information on your screen, especially people who don't need to show it at all.
The mechanism for working with lockscreens has not changed much since its appearance in earlier versions of the operating system. Why change something in a useful and, most importantly, properly working mechanism?
To be able to manage lockscreen, select the “Lockscreen” link in the lower right part of the window.
In the window that appears, you can choose any lockscreen you like from the “Lockscreen” list. At the same time, a small copy of the lock screen is displayed on the small screen at the top of the window. If you click the View button, you will be able to see its work "live", in full screen mode.
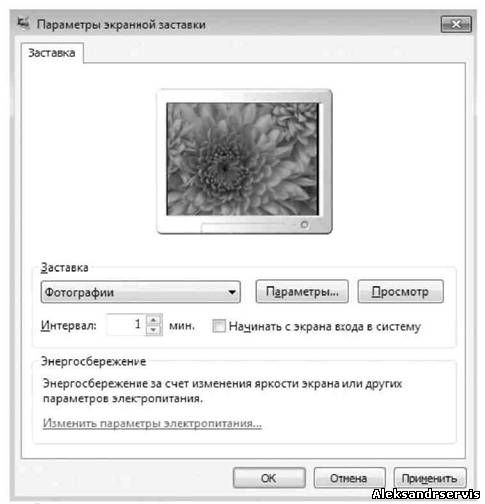
Almost all lock screens have parameters that you can customize. For example, if you select the “Lockscreen Photos”, then after clicking the “Properties” button, you can specify a folder with your images that will participate in the slideshow. You can also select the speed at which these images change.
If you want the screen saver to exit only when you enter your password, check the “Start from login screen” box. This opportunity is very often used by office workers, especially if one office is shared among several colleagues at once.
Desktop icons
As you probably already noticed, by default, immediately after installation, the operating system displays only the “Recycle bin” icon on the Desktop. What is the reason for such a decision is not clear, because the “Computer” and “Network” icons are used in practice much more often, and nevertheless the developers decided not to display them. This "outrage" is very easy to fix.
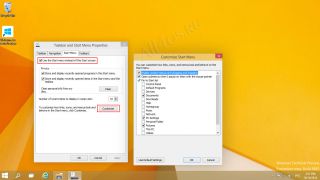
First, you need to open the Change desktop icons link on the left side of the window.
As a result, a window will open in which you will see a list of standard icons, as well as parameters that show their current state. If you want the “Computer” and “Network” icons to be present on the Desktop, just check the corresponding boxes in this window.
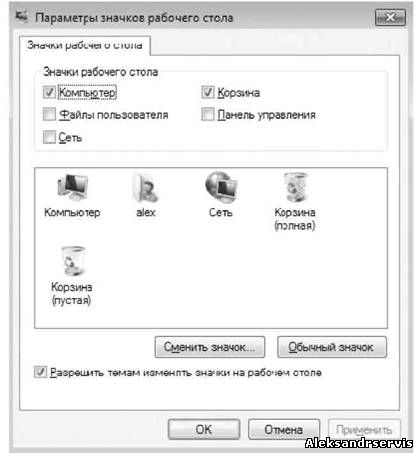
As in previous operating systems, in Windows 7, you can change the icon by clicking the “Change Icon” button. This will open a window containing a fairly large set of different icons. To return to the default icon image, click the “Regular icon” button.
If you want the desktop icons to change when you install a new theme, select the “Allow themes to change icons on the desktop” check box. In this case, the icons may acquire a more original appearance.
Mouse Pointer
The ability to customize mouse pointers existed in the earliest versions of the Windows operating system, so the developers of Windows 7 decided to use an already debugged mechanism. In doing so, they took it in the form in which it is present in Windows Vista.
User still has the ability to customize the following parameters:
■ Mouse buttons. You can adjust the double-click speed, turn sticking on or off, and re-arrange the buttons for left-handed users.
■ Pointers. There are over 10 different signage patterns to choose from. In this case, you can customize the appearance of the pointer for each mode, enable the display of the shadow. There is also an option to enable or disable the change of pointers when installing new skins.
■ Pointer parameters. You can customize pointer parameters such as how fast it moves, whether it disappears from the screen when typing, setting the pointer to the default button, showing a “tail”, and more.
■ Wheel. The mouse wheel is also customizable, for example, you can specify the number of lines by which you want to scroll the contents of the window with one scroll of the wheel. If you have a mouse that can tilt the wheel to the right and left, you can also use this feature for scrolling, such as scrolling the entire screen, which is convenient when reading e-books.
Account Picture
The account picture is what you see when you enter your login password or when you exit the lock screen. Additionally, this graphic also appears at the top of the Start menu. Not everyone likes the icon selected by the system, such as a bunny or a fish. The icon can be changed and it is very easy to do.
First, you need to click the “Change account picture” link, which is located in the left part of the window.
This will open a window in which you will see a set of images, as well as the image that your account is currently using. Any image present in the window can become a picture of your account, you just need to select it and click the “Change picture” button. You can also select your picture. To do this, you just need to follow the Search for other pictures link and specify its location on the disk. It supports the main graphic file formats.
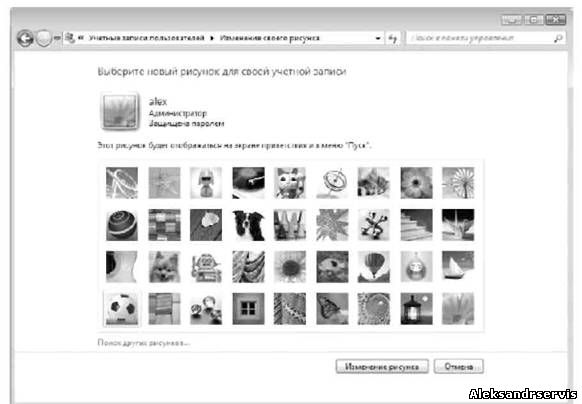
You can change pictures for other accounts that are registered in the operating system as well. If you have administrator rights, of course.
Desktop Gadgets
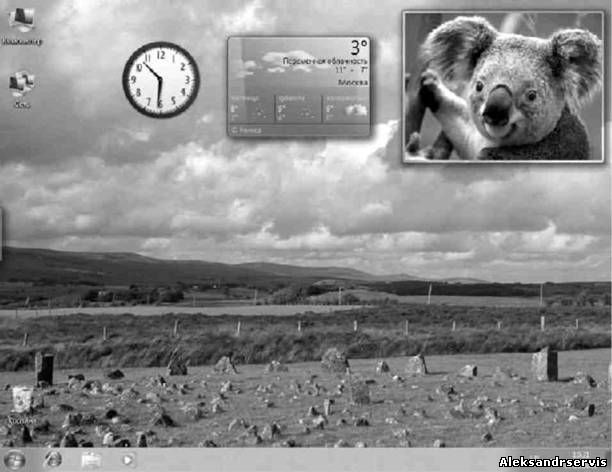
As mentioned earlier, unlike Windows Vista, in which gadgets could only be displayed in a special sidebar, in Windows 7 they can be placed anywhere on the desktop. In addition, it became possible to resize the gadget window.
The number of gadgets is increasing every day, and their quality is also increasing. There are 9 standard gadgets in Windows 7. In addition, you can download new ones from the Microsoft website or from any other website.
Gadgets vary in purpose. The most interesting are those that work as web services. For example, widgets for weather, currencies, news, etc., these gadgets display data from the Internet. There are also general-purpose gadgets such as clocks, assorted mini-games, slideshows, etc.
To manage gadgets, use the “Desktop Gadgets” option on Control Panel. After launching it, a window will appear.

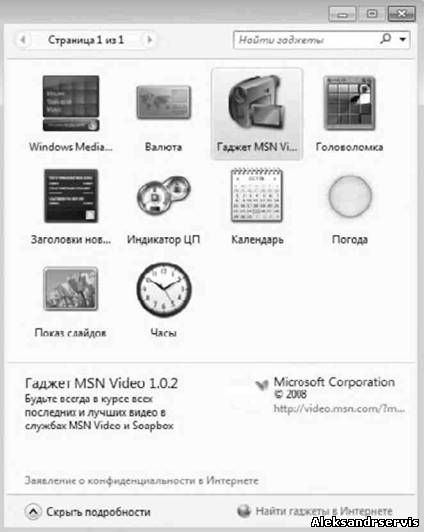
This window displays a list of gadgets that are currently installed on the system. Over time, as the number of gadgets increases, they all do not fit in this window, so the list can be scrolled using the navigation bar in the upper left corner of the window.
Each item in this list is provided with a short description that appears when the desired gadget is selected. By default, this window is displayed in compact mode, so you need to enlarge it to see the description. To do this, select the Show details link in the lower left corner of the window.
As mentioned above, new gadgets can be downloaded from the Internet, in particular from the Microsoft website. To do this, use the "Find gadgets on the Internet" link in the lower right corner of the window..
To add a gadget to the Desktop, simply drag it from the list to the Desktop. Or, right-click on the gadget and select "Add" in the context menu that appears. For example, consider using and configuring a standard weather gadget.
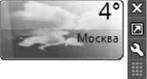
The window size of almost any gadget can be changed. However, as the window size increases, functionality can be added. For example, if you drag a weather gadget to the Desktop, it will be displayed in a reduced version by default, which implies displaying only the current weather forecast for the selected city. If you increase it, it will show the weather forecast for four days or more.

The window is enlarged this way: If you move the pointer to the gadget, an additional panel with buttons appears, among which there is a "Large" button. Clicking it increases the size of the window.
The same panel contains the “Options” button, which opens a window with the gadget's settings. In our case, if you click this button, a window will appear. There are only two parameters that affect the operation of the gadget - changing the type of temperature display and choosing the city in which you want to show the weather.
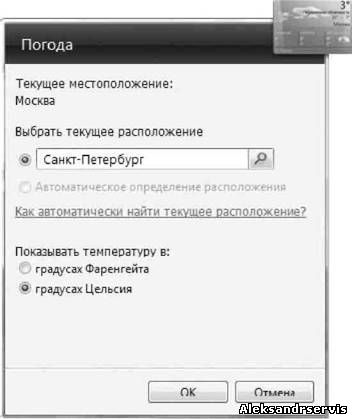
In oreder to change the city, for example to St. Petersburg, type part of the city name and press the search button. As a result, a list of matches will appear, from which you must select the desired position. After that click "OK" and enjoy the result.


 How to personalize and customize your Windows 7 Desktop